Quick facts
- Holds
- Twelve 27-gallon totes
- four high
- three wide
- Lumber(18) 2x4x96
- Size
- 81 1/2 in tall
- 75 1/2 in wide
- 27 1/2 in deep
- Between uprights20 1/2 in
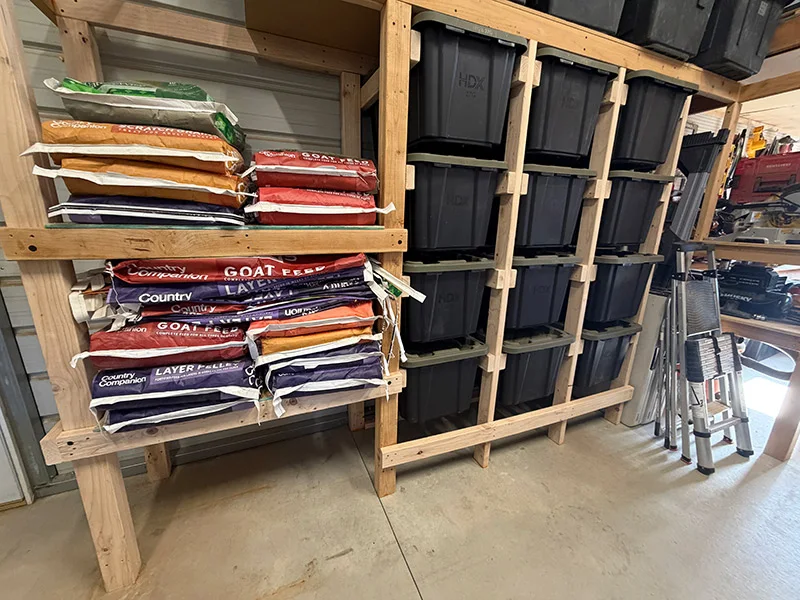
Stacked totes are a pain. The one you need is always on the bottom, so you unstack three to get to it. This rack fixes that. Each tote hangs by its rim on a pair of 2x4 rails and slides out like a drawer, so you can pull any one of them without touching the rest.
It holds twelve 27-gallon totes, four high and three wide, and it's built from nothing but 2x4s and screws. Mine is in the barn, under an overhead shelf and next to the feed.
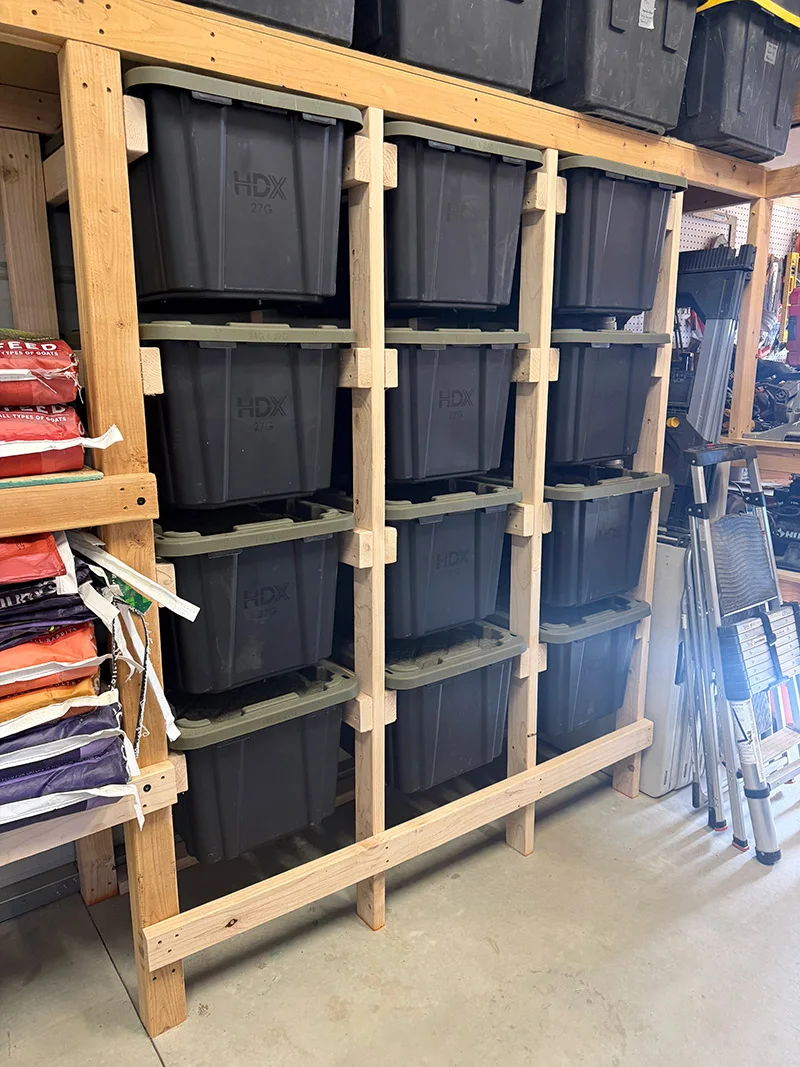
The Finished Size
| Measurement | Size |
|---|---|
| Height | 81 1/2 in |
| Width | 75 1/2 in |
| Depth | 27 1/2 in |
| Opening between uprights | 20 1/2 in |
| Opening between rails | 17 1/2 in |
The 81 1/2 inch height is what fit under the shelf I'd already built. If you have more or less room, change the upright length and nothing else.
Materials
Cut List
| Qty | Length | Part | Boards |
|---|---|---|---|
| 8 | 81 1/2 in | Uprights | 8, one from each |
| 24 | 27 1/2 in | Rails the totes hang on | 8, three from each |
Then pick one way to tie the ladders together. You need it at the bottom, and at the top too unless the rack is going under a shelf you can fasten it to.
| Qty | Length | Part | Boards |
|---|---|---|---|
| 1 or 2 | 75 1/2 in | A long board across the front: one at the bottom as in the photos, and one at the top if it stands alone | 1 or 2 |
| 6 or 12 | 20 1/2 in | Braces between the uprights, front and back: six at the bottom, and six more at the top if it stands alone | 2 or 3 |
How It Goes Together
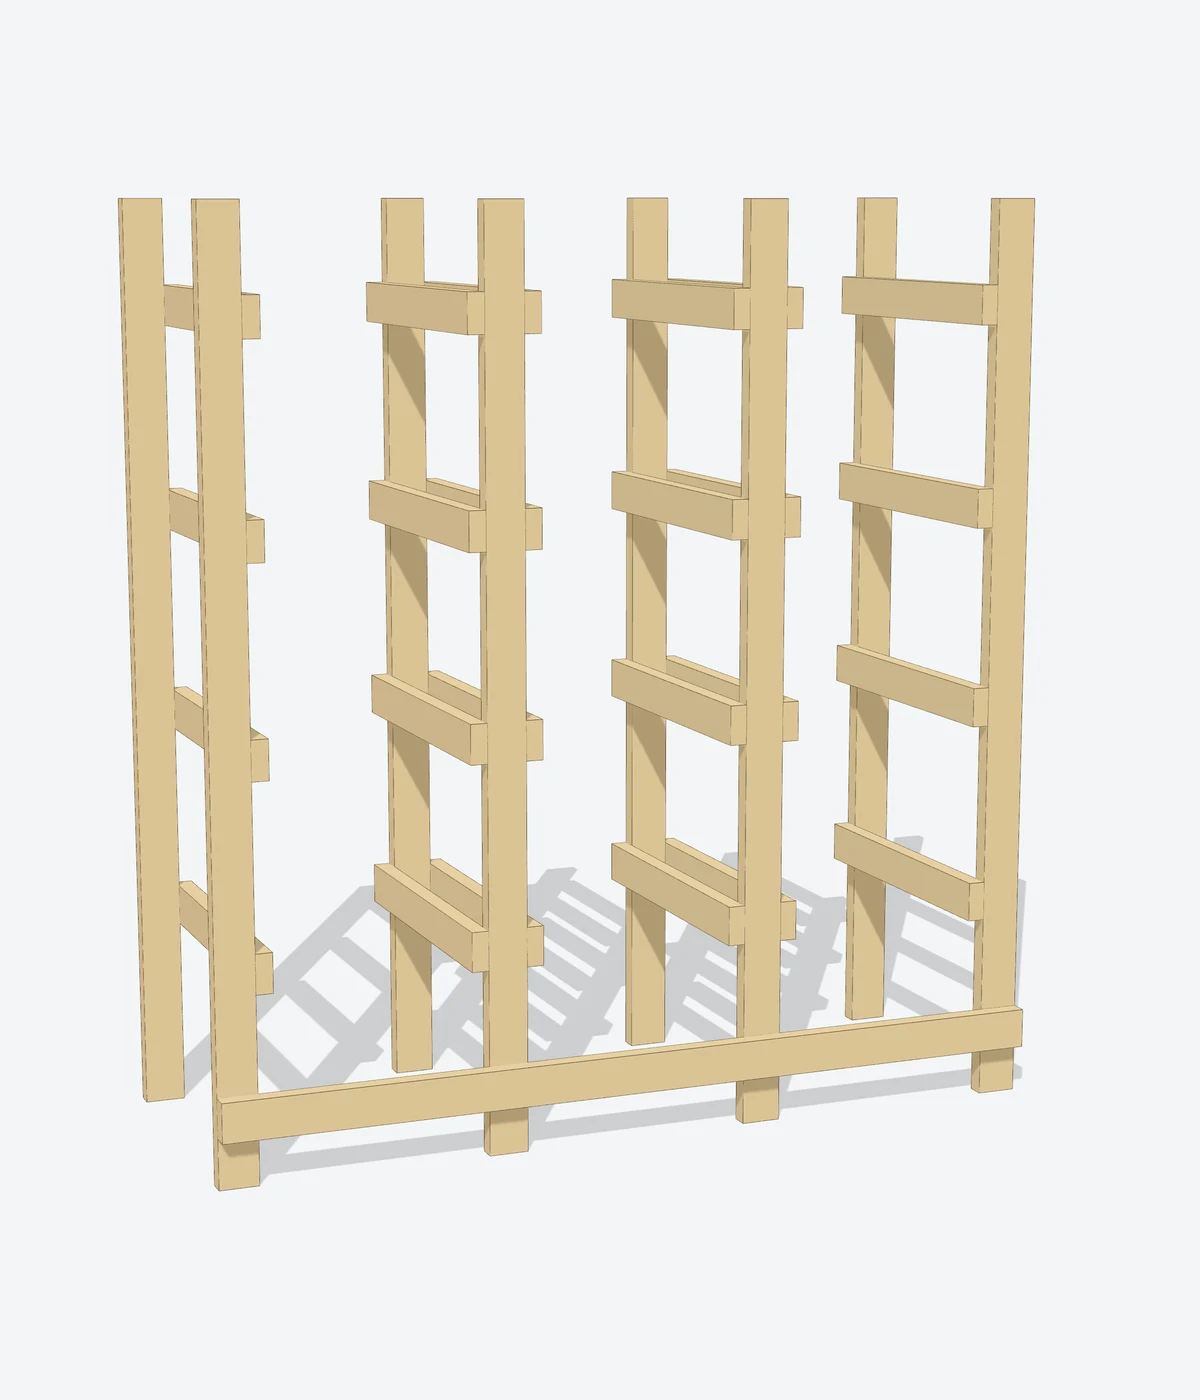
The rack is four ladders standing side by side. Each ladder is two uprights, one at the front and one at the back, with rails running front to back between them. The three gaps between the ladders are the tote bays.
Where the Rails Go
The rail heights depend on your tote, so measure it before you mark anything.
Hang one tote on a test pair of rails before you screw the rest. It takes five minutes and it tells you if the spacing is right.
Tying the Bottom and the Top
This is what's on mine. A single 2x4 runs across the front of all four ladders near the floor, screwed into the face of each front upright. It's the quickest way, and it holds the bay spacing for you.
The 20 1/2 inch pieces fit between the uprights, front and back, and you screw through the upright into the end of each brace. Stagger them: set the ones in the center bay slightly lower than the ones on either side. That leaves you room to drive the screws in from the other side of the upright without hitting the brace next door.
In my photos there's nothing tying the tops of the ladders together, because the shelf I'd already built above the rack does that job. Without a shelf over it, the rack needs the same treatment at the top as at the bottom: a second long board across the top front, or a second set of braces between the uprights. Then fasten it to the wall. A rack this tall full of loaded totes has to be anchored.
Check Your Totes First
These measurements are for 27-gallon totes. The tote has to do three things: its lid has to pass between the uprights (20 1/2 inches), its body has to drop between the rails (17 1/2 inches), and its rim has to be wider than that gap so it hangs.
If you're using a different tote, measure the lid and the body just under the rim. Set the space between the uprights a little wider than the lid, and check that the rim still catches the rails by a good half inch on each side.
Questions this answers
Tap a question for the short answer.
How do I build a storage rack for totes?
Build four ladders from 2x4 uprights with 2x4 rails screwed to their sides, stand them side by side with 20 1/2 inches between the uprights, and tie them together at the bottom and the top. Then screw it to the wall. Each tote hangs by its rim on a pair of rails and slides out like a drawer.
How many 2x4s do I need for a tote storage rack?
Eighteen 8-foot 2x4s cover a rack that holds twelve 27-gallon totes. Eight become the 81 1/2 inch uprights, eight become the 24 rails at 27 1/2 inches, and the last two tie the ladders together.
How far apart should the uprights be on a tote rack?
For 27-gallon totes, 20 1/2 inches between the uprights. With a 2x4 rail on each side, that leaves 17 1/2 inches between the rails for the tote to hang in.
Keep going
Related to this
Membership · $49.95 per year
Everything on this site, open, and your own manual that works with no internet
When the grid goes down, this site goes with it. Membership opens every member page and every recipe from the book, hands over all thirteen field guides as PDFs, and gives you your own manual built from the pages your household uses: searchable on your phone with no internet, and printable as one binder.
- 158member pagesopen in full, every amount and every step
- 138compound recipesfrom the hardcover book, exact amounts. Pick any and add them to your manual
- 13field guides304 pages of PDFs, $130 bought one at a time
- 9military field guidesUS Army manuals cut to 66 pages and laid out to use
- Offlineyour own manualbuilt from any page here, searchable on your phone with no internet
- Build your own manual on this site. pick any page, recipe, chart or whole field guide and put them in your order
- Download it and use it with no internet. it opens like an app on your phone or computer, searchable, with no power grid and no signal
- Print it or save it as one PDF. your cover, a contents page and every page you picked, laid out for paper
- All 138 recipes from my hardcover book. exact amounts for pool shock water purification, Lugol's iodine antiseptic, water glassing eggs, laundry powder and the rest
- All 13 field guides, 304 pages. Stockpile Essentials, Survival Foods, Bug-Out Bag, Home Canning, Solar Power and more, to read here or download
- 9 military field guides. Survival, First Aid, Mountaineering and the other US Army manuals, each cut to its most useful pages
- 158 how-to pages in full. medical, hygiene, tools and repair, garden and livestock, food, water and more
- The audit, the logbook and the checklists. all 200 audit checkpoints, saved to your account on every device
- One payment, $49.95 per year. Cancel any time and keep access to the end of the year you paid for.
- Sign in by email. No password, and the sign-in renews itself on every visit.
- Most of the site stays free. Membership is for the depth, the PDFs and your own offline manual.




Stay Ready
New entries, updates, and useful instruction.
Stay one step ahead on your preparedness journey.